TriCaster Playout Controller
Overview
With Rundown Creator, you can insert titles, graphics, audio clips, and video clips into your scripts, then play them out on your NewTek TriCaster using our new TriCaster Playout Controller.Our TriCaster Playout Controller can manage up to 20 channels on your TriCaster, including 2 graphics inputs, 15 framebuffers, 4 DDRs, and an audio player.
It generates a single playlist containing all of the elements in your show, so even with that many channels, playback is as simple as just pressing the space bar on your keyboard.
The playlist is real-time too, so it automatically updates anytime changes are made to your rundowns or scripts.
Requirements
- A Rundown Creator Pro or Educational subscription
- A compatible NewTek TriCaster:
- TriCaster Mini
- TriCaster 410
- TriCaster 455 (requires TriCaster 460 software, which NewTek offers as a paid upgrade)
- TriCaster 460
- TriCaster 855 (requires TriCaster 860 software, which NewTek offers as a paid upgrade)
- TriCaster 860
- TriCaster 8000 (requires TriCaster 8000 v2 software, which ships with all 8000s purchased after September 12, 2013, and NewTek offers as a free upgrade for everyone else)
- TriCaster TC-1
- TriCaster IP Series
- TriCaster 2 Elite
- TriCaster 1 Pro
- Rundown Creator Playout Controller plug-in
- An internet connection
Setup
There are three steps in the setup process:- Installing the Playout Controller Plug-in on Your TriCaster
- Creating New Title Templates, or Converting Existing Ones
- Moving Graphics, Audio and Video Files on Your TriCaster
Inserting Titles, Graphics, Audio Clips, and Video Clips into Your Scripts
1. Click on the "Insert a..." drop-down menu in the Script Editor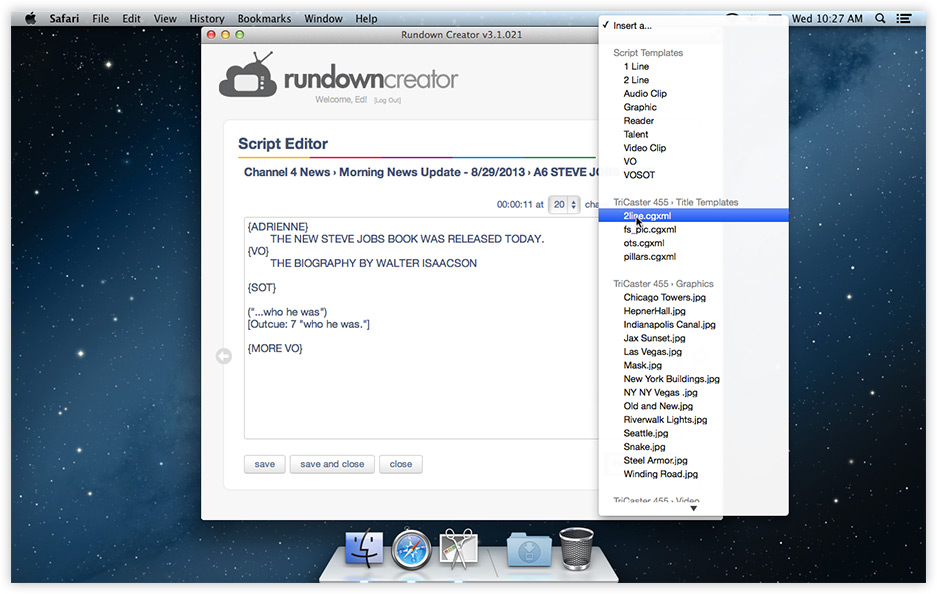
2. Select the title, graphic, audio clip, or video clip you'd like, and Rundown Creator will insert the appropriate object code into your script
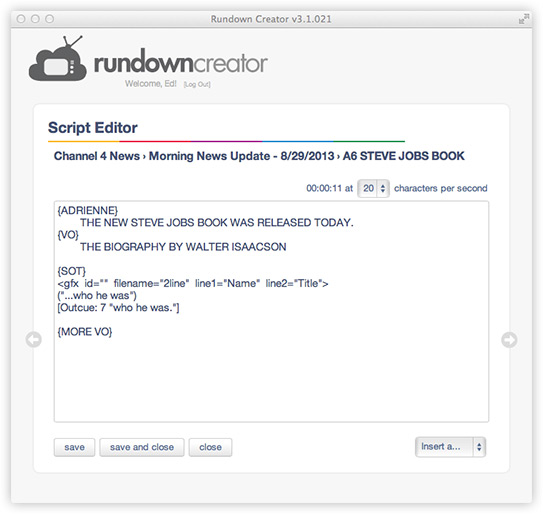
3. If you selected a title template, update any text or image template fields, as desired
For example, if you wanted a lower-third title template to say Walter Isaacson on the first line and Author, "Steve Jobs" on the second line, you would change the object code to look like:
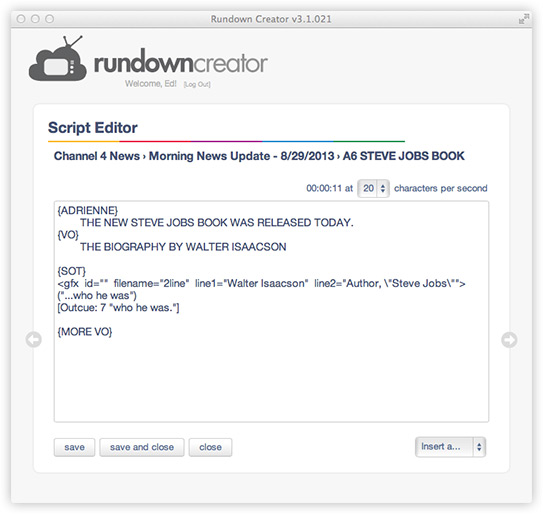
Note the \ before the double-quotes. Double-quotes must be "escaped" with backslashes like this when they appear inside of double-quotes.
If you want to manually assign a channel to the title, graphic, audio clip, or video clip, you can do so by adding a "channel" property with a channel abbreviation. For example, to assign this title to framebuffer 13:
<gfx id="" filename="2line" line1="Walter Isaacson" line2="Author, \"Steve Jobs\"" channel="fb13">
5. Save the script
The TriCaster Playout Controller
The TriCaster Playout Controller was designed to be powerful enough to meet the demands of the most challenging broadcast TV production environments, yet simple and intuitive. Still, some explanation is necessary to fully understand how it works.Loading the TriCaster Playout Controller
1. On the rundown page, click on the title/date of the rundown to bring up the Rundown Menu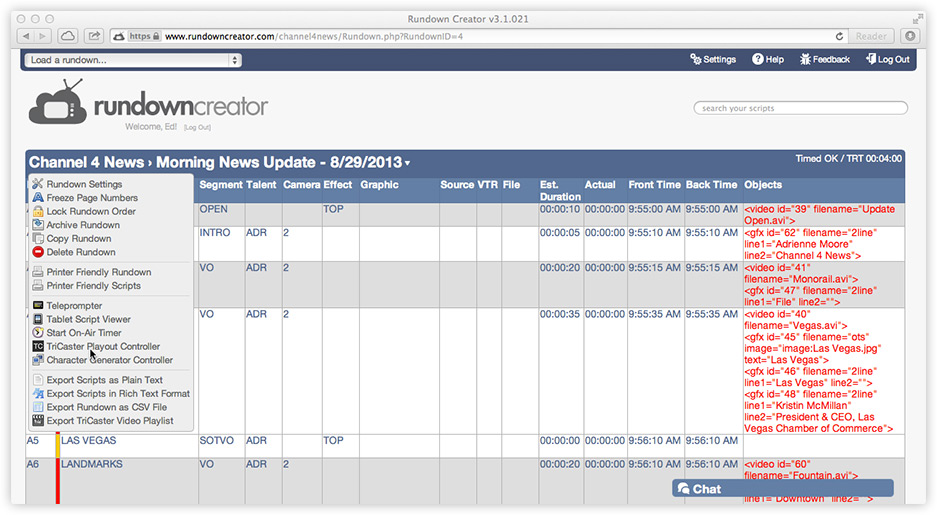
2. Click on the link that says "TriCaster Playout Controller"
Playlist
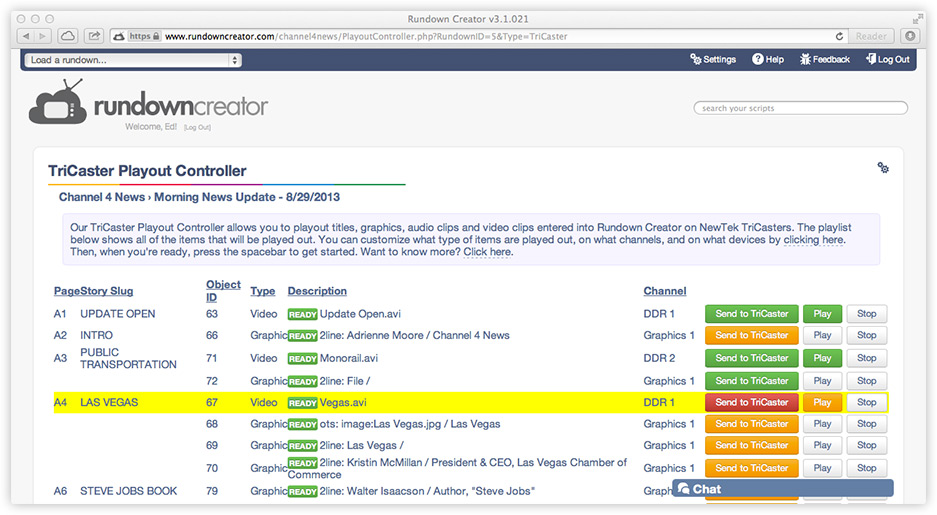
When the TriCaster Playout Controller loads, you'll see a playlist of all of the titles, graphics, audio clips, and video clips in your show. The playlist shows basic information for each item like the page number and story slug of the row it's in, the item's unique object ID, the type (either Graphic, Audio, or Video), a description of the item with real-time file status, what channel the item is assigned to (if any), and what actions are available.
Let's take a moment to go over a few of these in depth.
File Status
The file status shows whether or not a file is present on your TriCaster. If it's present, it'll say "Ready." If it isn't, it'll say "Missing." If it's unclear, it will say nothing. The file status updates in real-time.Channel
Our TriCaster Playout Controller automatically assigns channels to each title, graphic, audio clip, and video clip in the playlist, based on how you've configured it, but you can also manually assign them too.For more information on how to customize your channel assignment settings, see the "Settings" section below.
Settings
The TriCaster Playout Controller's settings panel allows you to customize what type of objects are played out, on what channels, and on what devices. To bring it up, just click on the blue settings icon in the upper-right hand corner of the screen.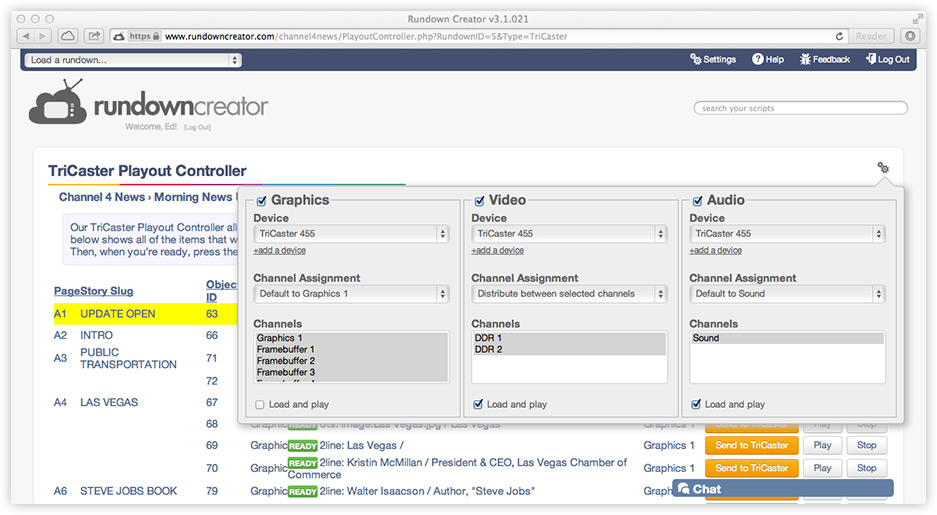
The settings panel is divided into three main sections -- one for graphics, one for audio, and one for video. Differentiating graphics, audio clips and video clips from each other like this allows you to apply different settings to each type of object.
Channel Assignment
The "Channel Assignment" drop-down menu allows you to specify how channels should be assigned to each type of item. For example, you could have video clips distributed amongst all of the DDRs on your TriCaster, graphics default to a specific graphics input or framebuffer, and audio clips default to a specific audio player.Channels
The "Channels" selector goes hand-in-hand with the "Channel Assignment" drop-down.When the "Channel Assignment" drop-down is set to "Distribute between selected channels," items will be distributed to the channels selected in the "Channels" selector.
When the "Channel Assignment" drop-down is set to "Default to (channel)," items will default to the specified channel, unless they have been manually assigned to one of the channels in the "Channels" selector.
Load and Play
When the "Load and Play" checkbox is checked, the TriCaster Playout Controller will load and play items in two separate actions, when triggered by the operator.Playout
Once you've inserted some titles, graphics, audio clips, and video clips into your scripts and configured the TriCaster Playout Controller, playing out items in the playlist is as simple as just pressing the spacebar on your keyboard.If you checked the "Load and play" checkbox for a specific type of item, then playing it out will be a two-step process. The first step will be to load the item in the channel it's assigned, and the second step will be to play it. Each step will be triggered separately when the operator either hits the spacebar or clicks/taps on an element in the playlist.
The yellow bar shows what will be played out next. You can move it around using the up/down arrow keys on your keyboard, or by clicking/tapping on an item's description in the playlist.
Buttons
Send to TriCaster - sends an item to your TriCaster, on the channel it's assigned toPlay - plays an item on your TriCaster, on the channel it's assigned to
Stop - stops playback on the channel the item is assigned to
Color-Coding
The "Send to TriCaster," "Play," and "Stop" buttons are color-coded as follows:- Orange - when a button is orange, that means that the action it represents will be triggered as part of the playout process. For example, if the "Send to TriCaster" and "Play" buttons are both orange, that means that the item will be sent to the TriCaster when triggered by the operator the first time, and then played when triggered a second time
- Red - when a button is red, that means that the action it represents will be triggered next, when the operator either presses the spacebar or clicks/taps on the item in the playlist
- Green - when a button is green, that indicates that the action the button represents has already been triggered. For example, if an item's "Send to TriCaster" button is green, that would mean that the item has already been sent to the TriCaster
Tips & Tricks
Preload All Channels
If you press the shift key and the spacebar, the TriCaster Playout Controller will load the first item assigned to each channel on your TriCaster, beginning where the yellow bar is. If you press the shift key, control key, and the spacebar, the TriCaster Playout Controller will load all items on your TriCaster, beginning where the yellow bar is.Editing a Script
If you click on an item's page number or story slug in the playlist, that will open the Script Editor, where you can make changes to the script, or any of the titles, graphics, audio clips, or video clips in it.Keyboard Shortcuts
| Up | Go to the previous item |
| Down | Go to the next item |
| Shift + up | Go to the first item for the previous story |
| Shift + down | Go to the first item for the next story |
| Home | Go to the first item in the playlist |
| End | Go to the last item in the playlist |
| Spacebar | Trigger next action |
| Shift + spacebar | Preload all channels starting where yellow bar is |
| Shift + control + spacebar | Send all items to TriCaster starting where yellow bar is |
| Enter | Edit script |
| P | Play |
| S | Stop |
| O | Send to TriCaster |
Channel Abbreviations
| Graphics 1-2 | gfx1, gfx2 |
| Framebuffer 1-15 | fb1, fb2, ... fb15 |
| DDR 1-4 | ddr1, ddr2, ddr3, ddr4 |
| Audio | audio1 |
