Ross Video XPression Integration
Rundown Creator now integrates directly with Ross Video's XPression character generator. The integration allows you and your team to insert information for lower-thirds, fullscreen graphics, over-the-shoulder boxes, and more into Rundown Creator, then play them out with a single key press from the XPression sequencer. It's all real-time too, so any changes made in Rundown Creator show up instantly in XPression.
For example:
That would insert a lower-third graphic with "RON BURGUNDY" on the first line and "CHANNEL 4 NEWS" on the second line.
Obviously, typing all that everytime you want to enter a lower-third graphic would be tedious. So, to make things easier, we recommend setting up script templates in Rundown Creator for each scene in your XPression project file.
Requirements
To use our XPression integration, you'll need:- An active Rundown Creator Pro or Educational subscription
- Ross Video's XPression Studio, XPression Prime or BlueBox character generator software
- An internet connection
- Administrator privileges on your XPression
- Administrator privileges in Rundown Creator
Setup instructions
Step 1: Installing our plugin
- On your XPression, download and run our XPression plugin installer
Download Plugin - On your XPression, open a web browser, log in to Rundown Creator, go to "Settings" > "Devices" and click on the link that says "Download cfg.json file". A cfg.json file will be downloaded to your computer. Move that to C:\Program Files (x86)\Rundown Creator\
- Start the plugin by clicking on the shortcut on the desktop
Step 2: Configuring XPression
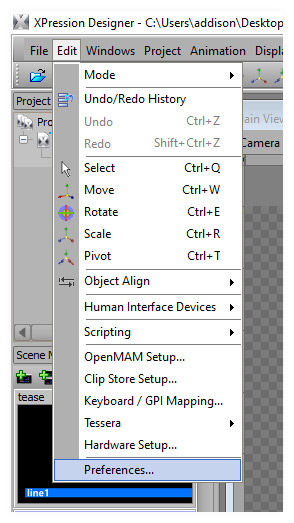
To setup the interface between Rundown Creator and XPression, we'll need to change some settings in XPression.- In XPression, go to "Edit" > "Preferences"
- Go to the "XML Take Item List" section and match the settings below:
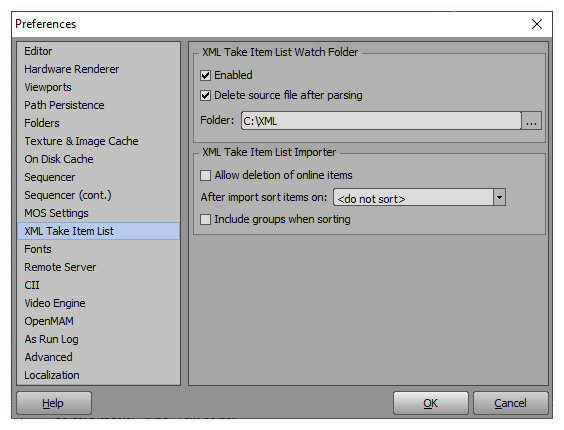
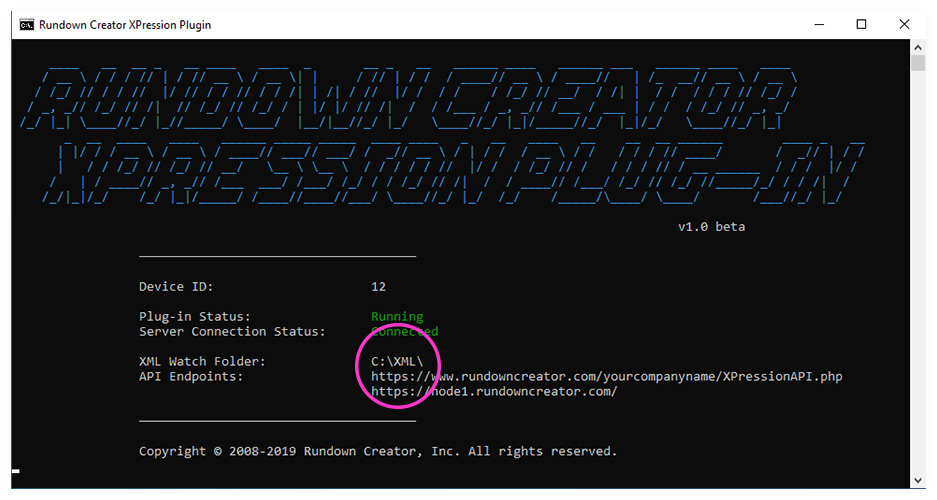
- Make sure the "Folder" path matches the "XML Watch Folder" path displayed by the plugin terminal. It might not be C:\XML\ for everyone
- Click the "OK" button
Step 3: Setting up templates in XPression
- Open your XPression project file
- For each scene:
- For each text, image, or video layer you want to update, make sure the layer name contains only alphanumeric characters (A-Z, a-z, 0-9), hyphens (-), and underscores (_). For example: line1, line-1, line_1, or LINE1, but not line 1
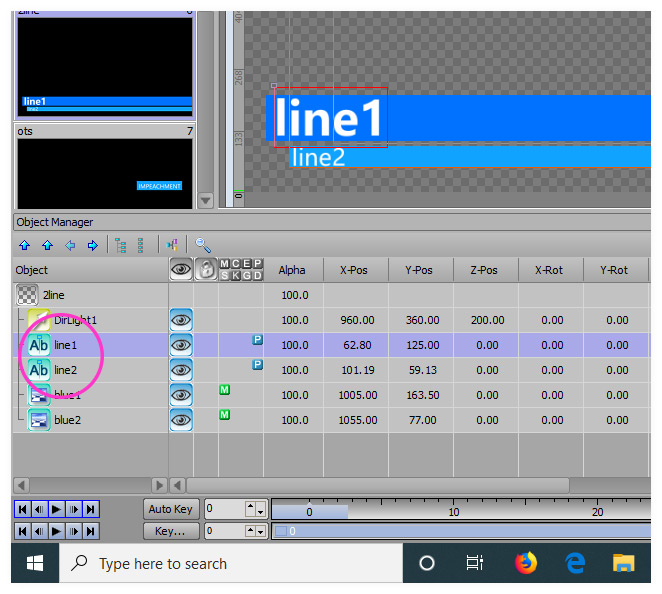
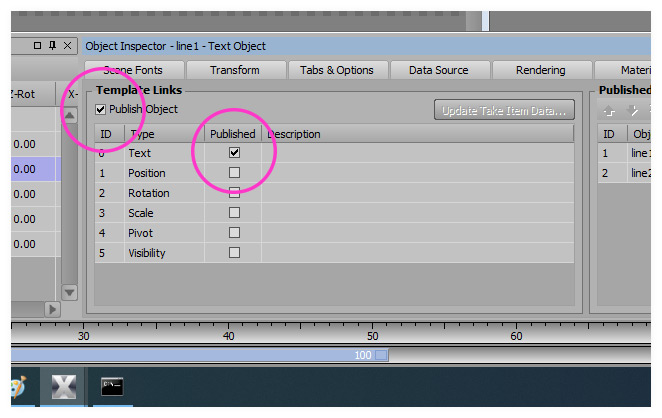
- For each text layer you want to update, go to "Template Links" and click the "Publish Object" checkbox for the "Text" option
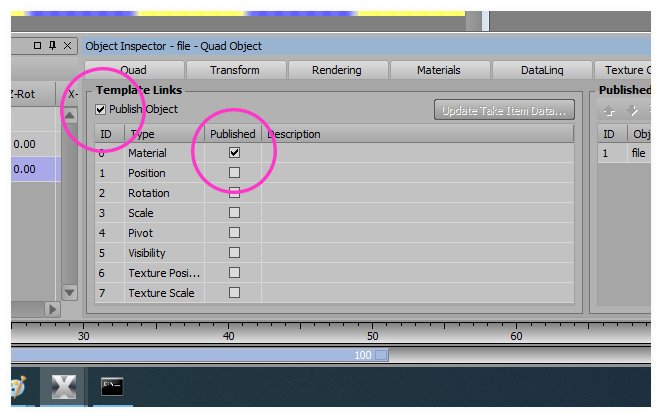
- For each image or video layer you want to update, go to "Template Links" and click the "Publish Object" checkbox for the "Material" option
- For each text, image, or video layer you want to update, make sure the layer name contains only alphanumeric characters (A-Z, a-z, 0-9), hyphens (-), and underscores (_). For example: line1, line-1, line_1, or LINE1, but not line 1
- Save your XPression project file
Step 4: Setting up script templates in Rundown Creator
Inserting lower-thirds, fullscreen graphics, over-the-shoulder boxes, etc will require using "object code" in your scripts in Rundown Creator.For example:
<xpression
	id=""
	scene="2line"
	line1="RON BURGUNDY"
	line2="CHANNEL 4 NEWS"
>
That would insert a lower-third graphic with "RON BURGUNDY" on the first line and "CHANNEL 4 NEWS" on the second line.
Obviously, typing all that everytime you want to enter a lower-third graphic would be tedious. So, to make things easier, we recommend setting up script templates in Rundown Creator for each scene in your XPression project file.
- In Rundown Creator, go to "Settings" > "Script Templates"
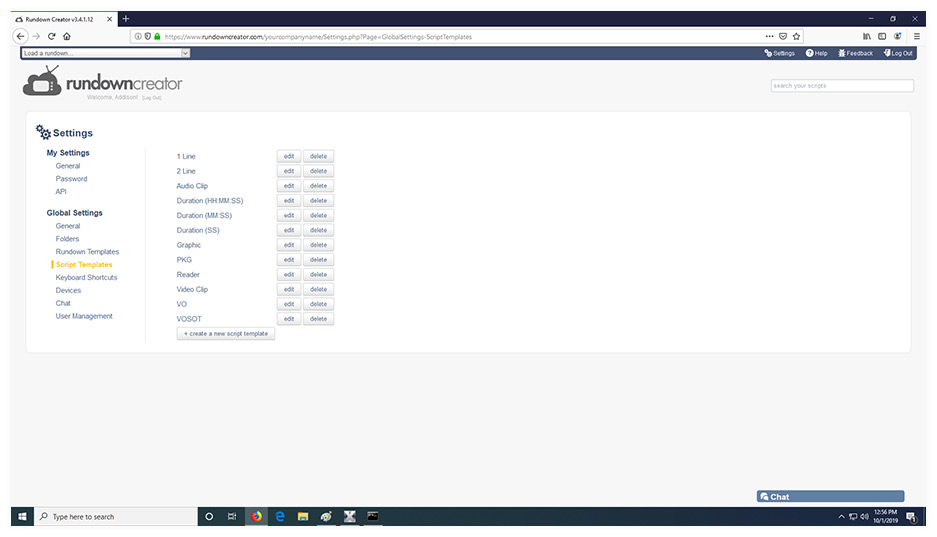
- For each scene in your XPression project file:
- Create a new script template in Rundown Creator by clicking on the button that says "+ create a new script template"
- Give the new script template a descriptive name
-
For the "Content" field, start with this:
<xpression
	id=""
	scene=""
>
id is a required field. Leave it blank. Rundown Creator will assign new objects an ID when they're saved in scripts
-
Change scene to the scene name in XPression, i.e.:
<xpression
	id=""
	scene="2-line-with-graphic"
>
-
For each text, image, or video layer you want to be able to update in Rundown Creator, add key/value placeholders, like this:
<xpression
	id=""
	scene="2-line-with-graphic"
	line1=""
	line2=""
	image="file:C:\Assets\BreakingNews.png"
>
-
In addition to required parameters like id and scene, you can also specify several optional, XPression-specific parameters in object code, like:
- fb - the framebuffer to assign the item to in the sequence. Defaults to 1
- layer - the layer to assign the item to in the sequence. Defaults to 1
-
trans_in_type - the transition in to assign to the item in the sequence. Defaults to cut. Possible values include:
- cut
- dissolve
- dissolve-fade
- dissolve-overblack
- dissolve-additive
- dissolve-saturate
- dissolve-desaturate
- dissolve-invert
- push-rtl (right-to-left)
- push-ltr (left-to-right)
- push-ttb (top-to-bottom)
- push-btt (bottom-to-top)
- push-br (bottom-right)
- push-tr (top-right)
- push-bl (bottom-left)
- push-tl (top-left)
- distort-diverge
- distort-pixelate
- distort-sinewave
- distort-shrink
- distort-shrinkdiff
- distort-spiral
- trans_in_duration - the transition in duration for the item in the sequence. Defaults to 50 if a transition is specified using trans_in_type, or 0 otherwise
- trans_in_offset - the transition in offset in frames for the item in the sequence. Defaults to 0
- trans_in_reversed - 1 if the transition in should be reversed, 0 otherwise. Defaults to 0
- trans_out_type - same as trans_in_type, but for the transition out
- trans_out_duration - same as trans_in_duration, but for the transition out
- trans_out_offset - same as trans_in_offset, but for the transition out
- trans_out_reversed - same as trans_in_reversed, but for the transition out
Example:
<xpression
	id=""
	scene="2-line-with-graphic"
	line1=""
	line2=""
	image="file:C:\Assets\BreakingNews.png"
	fb="2"
	layer="10"
	trans_in_type="push-btt"
	trans_in_duration="25"
	trans_in_offset="5"
	trans_in_type="dissolve"
	trans_in_duration="20"
>
-
Press the button that says "go" to save the script template
Inserting items into your scripts in Rundown Creator
Now that we've created script templates, inserting lower-thirds, fullscreen graphics, over-the-shoulder boxes, etc is as simple as selecting the appropriate template in the script editor, and changing the values as needed.How to start/restart the Rundown Creator XPression plugin
If the Rundown Creator XPression plugin isn't running, or you'd like to reset the interface for whatever reason, follow these steps:-
In XPression, go to the "Sequence" tab
-
Delete all of the items in the sequence by pressing CTRL-A and then the "Delete" key
-
Start the Rundown Creator XPression plugin by clicking on the shortcut on the desktop
If the shortcut is missing, you can start the plugin by going to C:\Program Files (x86)\Rundown Creator\ and double-clicking on Start.bat